You can enable two-factor authentication in WordPress using a WordPress security plugin like Wordfence or 2FA plugin like WP 2FA.
So, question this to yourself- Is my website secure? Understand that, one of the many ways to strengthen your website’s security is by enabling WordPress Two-Factor Authentication (2FA).
Simply put, 2FA provides an extra protection layer to your website’s login procedure to prevent unauthorized user access. But how can you enable 2FA?
This guide explores the free methods on how to enable Two-Factor Authentication for WordPress sites. This keeps your site safe without any extra costs.
Ready to enhance your website’s security? Let’s go!
IN THIS GUIDE
hide
What is Two-Factor Authentication?
To all those beginners, understand the term first.
Two-Factor Authentication (2FA) is an additional security measure to protect your online accounts. Here, the term ‘two’ comes into play as it has two forms or factors of identification before granting access to your account.

Curious what those two factors are? They are:
- Something you know (like your password)
- Something you have (your mobile phone or an app)
Overall, attackers will have a hard time breaking into your account with this double-layered security, even if they have your password.
For instance, you log into your email. There, you first enter your password. Now, suppose you’ve 2FA set up on your email.
In that case, you won’t get direct access to your account. Instead, you’ll be prompted to enter a code. Depending on how you configured it, the code is sent to your phone or generated by an authenticator app (like Google Authenticator).
Only after you correctly enter that code in real-time will you get access to your account. So, even if someone knows your password, they can’t get access to your account without that code.
Why Enable WordPress Two-Factor Authentication?
Unquestionably, you must also enable Two-Factor Authentication on your WordPress site. Check out the major reasons why you must do that:
- Enhanced Security: As mentioned before, 2FA safeguards your site from unauthorized access. One extra security even if passwords are compromised.
- Prevents Brute Force Attacks: It becomes harder for hackers to break into your website or database when using automated tools.
- Protects Sensitive Data: Enriched website security means your personal and business details saved on your website are safer.
- Compliance with Best Practices: Enabling 2FA aligns with modern security standards and practices for online account protection.
- Peace of Mind: You’ll be relieved knowing that your site is better protected from common security threats.
Well, let’s get down to business now!
3 Best Free Plugins to Enable 2FA in WordPress
WordPress core doesn’t have the ability to provide 2FA on your website. But no worries! There are several free WordPress plugins that let you enable it.
In addition, you can upgrade the plugin’s premium plan (if available) to access advanced capabilities. Here, we’ve picked the top security or 2FA-focused plugins to ensure your website’s security. So, choose one that fits your needs most.
Without further delay, let’s jump right into it!
1. Wordfence Security
Wordfence Security is one of the best WordPress security plugins that offers robust website protection. You can easily configure its 2FA capabilities to improve your site’s login security. Just enable this function on different user roles as you want.

Moreover, you can configure 2FA using authenticator apps like Google Authenticator, FreeOTP, or Authy. Users can just scan the QR code or enter the key from that application to configure 2FA on their account via the authenticator app.
Features
- Provides 5 recovery codes to log into your website if the app is unavailable.
- Lets you specify the grace period for your users to configure their 2FA.
- You can allow the user’s device to remember them for 30 days without needing to enter the code.
- Lists your site users who are logged in, 2FA active, and 2FA inactive.
- Ensure if XML-RPC calls requiring authentication need a valid 2FA code.
Pricing
Wordfence Security is a freemium WordPress plugin with both free and premium plans. You can use the free plugin by downloading it from the WordPress.org plugin directory. Otherwise, install the plugin on your dashboard.
The following are the premium pricing plans available:
- Premium: $149 per year, real-time threat intelligence, and paid support.
- Care: $590 per year, Premium plan features, monitoring, and hands-on support.
- Response: $1250 per year, Care plan features, 1-hour response time, etc.
2. WP 2FA
WP 2FA is a beginner-friendly WordPress 2FA plugin. It offers a setup wizard on which you can configure 2FA on your site without much technical knowledge.

In addition, this plugin provides 2FA for all user roles. This can be via Time-Based One-Time Passwords (TOTP), like authenticator apps or email-based codes.
Features
- You can edit email templates on which users receive the 2FA login process.
- Enforce 2FA policies, like your site users can set up 2FA right after login or within a defined grace period.
- Offers an API to integrate 2FA methods like OTP Token, WhatsApp, etc.
- Provides 2FA backup codes to use when the authenticator app isn’t working.
- The premium plans allow the need to enter a 2FA code after a password reset.
Pricing
WP 2FA is also available in both free and paid versions. Directly install the free plugin on your WordPress dashboard or download it first from WordPress.org.
If you want advanced capabilities, then upgrade it to one of these premium plans:
- Premium: $79/year for 1 site license, user role-based configuration, grace period, trusted devices, and more.
- Enterprise: $89/year for 1 site license, Premium features, white labeling, priority support, etc.
3. Google Authenticator
Another popular WordPress 2FA plugin for your website is Google Authenticator. This plugin supports authentication methods like TOTP via authenticator apps and One-Time Passwords (OTPs) via email or SMS.

If you want to log in urgently without the authenticator app, then there are backup 2FA methods. This includes KBA (security questions), OTP login using email, and backup codes. Plus, the email templates are also customizable.
Features
- Supports Google Authenticator, Microsoft Authenticator, LastPass Authenticator, etc.
- Integrates with WordPress plugins like WooCommerce, Elementor Pro, and User Registration.
- Functions in multisite networks with a maximum of 3 subsites.
- Add or exclude the 2FA checkbox via shortcodes on any web page.
- Customize the 2FA login popup to match your brand and site theme.
Pricing
Get started with this plugin for free by downloading it from the WordPress.org plugin repository and adding it to your website. Another way is to install it right from your WordPress dashboard.
Want to boost your site’s security even further? Pick one of its premium options:
- Starter: $69/year, 1 site, role-based 2FA policies, unlimited email transactions, backup login methods, etc.
- Enterprise: $99/year, 1 site, Starter features, passwordless login, WooCommerce 2FA, support on all registration forms, etc.
- All Inclusive: $149/year, 1 site, Enterprise features, prevent credential sharing, shortcode for enabling 2FA on any page, etc.
Hopefully, you’ve chosen the right plugin for enabling 2FA on your site. Well, we’ve discussed the steps using a security and a 2FA plugin. Here we go!
How to Enable WordPress Two-Factor Authentication? (Security Plugin)
A security plugin is a must-have for your WordPress website. If you’re planning to use a security plugin, then ensure it has the 2FA feature.
Among the different options, Wordfence Security stands out the most. Cherry on top, if you’re already using this plugin, then no need for another 2FA plugin.
With that being said, let’s dive into the steps of enabling 2FA using Wordfence.
Step 1: Install and Activate Wordfence Security
Let’s start with the plugin installation process.
First, log into your WordPress dashboard and navigate to ‘Plugins > Add Plugin.’ There, search the plugin by entering the keyword ‘Wordfence Security.’ Once you find it, click the ‘Install Now’ button.

Moving forward, click the ‘Activate Plugin’ button.

Step 2: Install the Free License
Right after that, you’ll find a pop-up message. There, press the ‘Get Your Wordfence License’ button.

This redirects to the license registration page on its official website. Among the different free and premium license options, click ‘Get a Free License.’

Now, a pop-up opens showcasing the limitations of the free security plugin. However, the free plan has the basic yet essential 2FA options. So, let’s hit the ‘I’m OK waiting 30 days for protection from new threats’ option.

Next, you must enter your email address, where you’ll receive the license key. Also, make a choice whether you want to receive security alerts on your email.
After agreeing to the terms and conditions, press the ‘Register’ button.

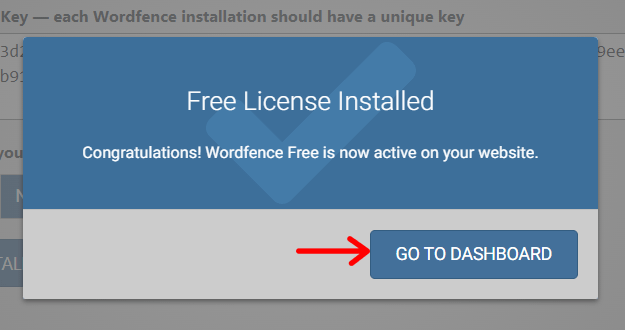
Check your email, as you may have received the license key to complete the registration. So, click the ‘Install My License Automatically’ button on the email.

Following that, your website opens up, and you’re on the ‘Install’ menu of the plugin. There, you’ll find the email and license key already added. Now, click the ‘Install License’ button.

This installs the license, and now you can proceed to click ‘Go to Dashboard.’
Step 3: Configure the 2FA Settings
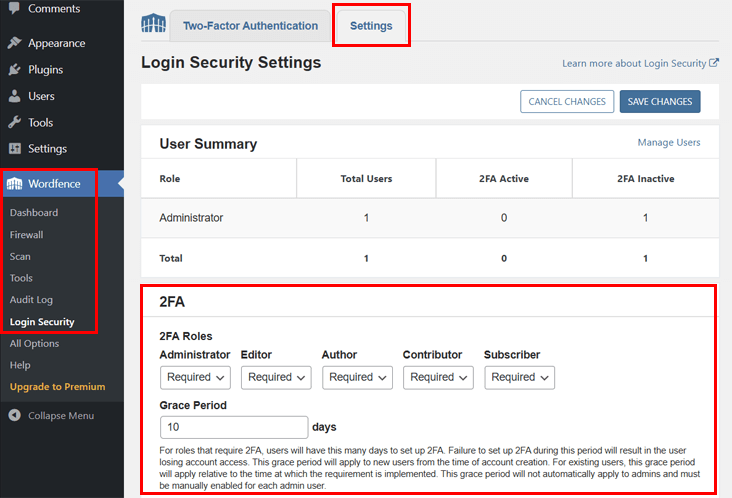
With that, you’re on the Wordfence dashboard. The next step is to configure the 2FA settings. So, navigate to ‘Wordfence > Login Security > Settings.’
As the administrator of your website, you can adjust a bunch of configurations. On this page, you’ll see the ‘2FA’ section. There, you can perform these actions:
- First, set the 2FA roles. For every user role, you can choose between Disabled, Optional, and Required. It’s recommended to set it to ‘Required’ for all the user roles. With that, everyone must enter a 2FA code to log in.
- Below that, you can enter the grace period. By default, it’s 10. This means within 10 days from this configuration, your existing site users must set up 2FA on their account. For new users, it begins after their account creation.
- Choose to enable or disable remembering of the device for 30 days after enabling 2FA to an account.
- Require or skip 2FA for XML-RPC calls that need authentication.
- Disable XML-RPC authentication to not allow the attempt in any situation.
After completing these steps, click the ‘Save’ button.

Next, go to the ‘Two-Factor Authentication’ tab, and you’ll find two sections.
- QR code and authentication key
- Recovery code

We’ll understand and use them in the upcoming steps. Keep reading!
Step 4: Add a New Entry in the Authenticator App
Moving forward, you can install and configure an authenticator app on your device. There are several free options in the Play Store. Plus, Wordfence Security supports a bunch of options, including Google Authenticator, FreeOTP, or Authy.
Here, we’ll go with Google Authenticator. Once the app is installed and logged in, click the ‘Add a Code’ button.

By clicking it, you’ll get two options:
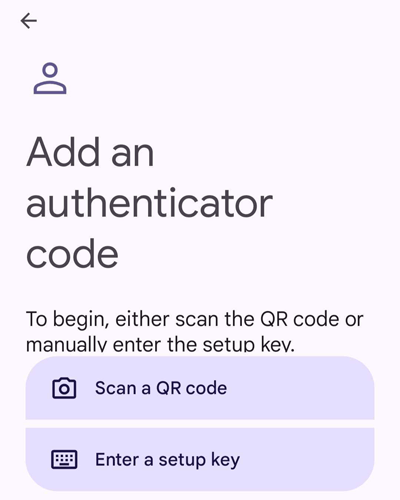
- Scan a QR code: If you go with this option, then just scan the QR code present on your WordPress dashboard. That’s it!

- Enter a setup key: Choosing this option means you can manually enter the authentication key present right below the QR code. So, type the code name and key along with picking the key type, followed by pressing ‘Add.’

Both options are available to easily set up 2FA on the authenticator app. Hopefully, you got the website’s name in your authentication app now.

Step 5: Download the Recovery Codes
Now again, go back to your WordPress dashboard.
There, you’ll find the 5 recovery codes that you can use if your authenticator app or device isn’t working or is lost. Yes, you can just enter this long code instead of the code generated on your authenticator app.
So, it’s best to click the ‘Download’ button and save the file on your device.

Remember, these recovery codes don’t expire. However, each of these can only be used once. If you have already used all of them, then you can generate new ones, too.
Step 6: Activate 2FA on WordPress
This completes the process of enabling WordPress Two-Factor Authentication. But remember to activate it as well.
Simply put, enter the real-time code generated from your authenticator app in the given field. Lastly, click the ‘Activate’ button.

Notably, the code changes every 30 seconds. So, you must be quick. If the code expires, then you can enter the next code instead.
Step 7: Log into Your Site with 2FA
With that, you can test your WordPress website to check if 2FA is working.
So, log out of your website and open the login page. There, enter your username and password, followed by clicking the ‘Log In’ button.
This time, you’ll get the new ‘Wordfence 2FA Code’ prompt. Hence, you can enter the code generated from your authenticator app for your website. Once it’s done, hit the ‘Log In’ button.
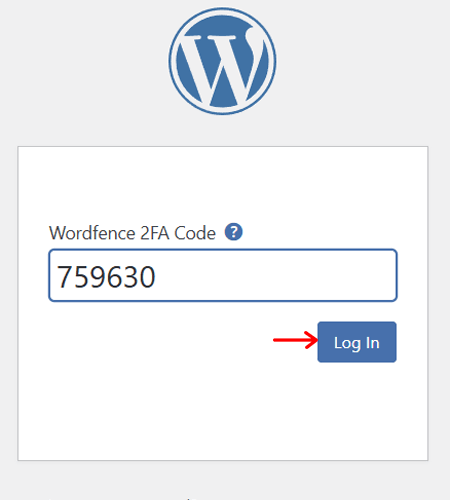
Congratulations on enabling 2FA on your WordPress website!
For a more detailed guide, you can check out about 2FA on the Wordfence site.
How to Enable Two-Factor Authentication in WordPress? (2FA Plugin)
Suppose your security plugin doesn’t have the best 2FA feature. Or you’re looking for a standalone plugin to enable 2FA only. Then, you can go with WP 2FA.
Let’s jump right into how to enable WordPress Two-Factor Authentication.
Step 1: Install and Activate WP 2FA
Start from the plugin installation process now.
Head back to your WordPress dashboard and go to ‘Plugins > Add Plugin.’ There, search for the keyword ‘WP 2FA.’ Once you find the plugin, click ‘Install Now.’

Right after that, click the ‘Activate Plugin’ button.

Step 2: Use the Setup Wizard
Next, the setup wizard opens, where it brings a user-friendly interface to configure 2FA on your website. On the ‘Welcome’ tab, press the ‘Let’s Get Started!’ button.

Now, you’ll get two options to configure the 2FA methods. They are:
- One-time code via 2FA App (TOTP)
- One-time code via email (HOTP)
Here, let’s tick only the first option and click the ‘Continue Setup’ button.

Next, you can find Backup codes as an alternative choice for 2FA login. It’s best to enable this option and press ‘Continue Setup.’

Following that, 2FA policy configuration options are present. There, you get to enforce 2FA for all or some website users. Let’s go with ‘All users’ and press the ‘Continue Setup’ button.

Moving forward, you can also exclude any users or roles for 2FA login. Mention them if you want and hit ‘Continue Setup.’

Lastly, you’ll get multiple settings to configure the grace period. This includes:
- Make your users configure 2FA right away.
- Add a grace period that can be within hours or days.
- Choose to either discontinue the account access to those who don’t set up 2FA. Otherwise, block the users so that only the admin can unblock them.
- Notify the users about the 2FA configuration through an admin notice on the dashboard or on a page right after they log into the dashboard.
Once you complete these steps, press the ‘All Done’ button.

Step 3: Configure the 2FA on the Authenticator App
After the setup wizard’s work is done, press the ‘Configure 2FA Now’ button.

This redirects you to your WordPress dashboard with a pop-up to configure TOTP. Here, you can find the QR code and the authentication code that you can use to configure 2FA on your account via an authenticator app.

So, it’s time to install an authenticator application on your mobile phone. This can be Google Authenticator, Authy, or any other compatible app.
In this scenario, let’s move forward with Google Authenticator. After its installation and account access, click the ‘Add a Code’ button.
By clicking it, you’ll get two options:
- Scan a QR code: By going with this option, you can scan the QR code shown in the popup in the WordPress dashboard.

- Enter a setup key: This alternative way lets you manually type the one authentication code provided by WP 2FA. Just provide a code name and insert the code with the key type as default. Then, hit ‘Add.’

It’s a success if you found your site added to the app’s interface with the code.
Once you’re sure, click the ‘I’m Ready’ button on your WordPress dashboard.

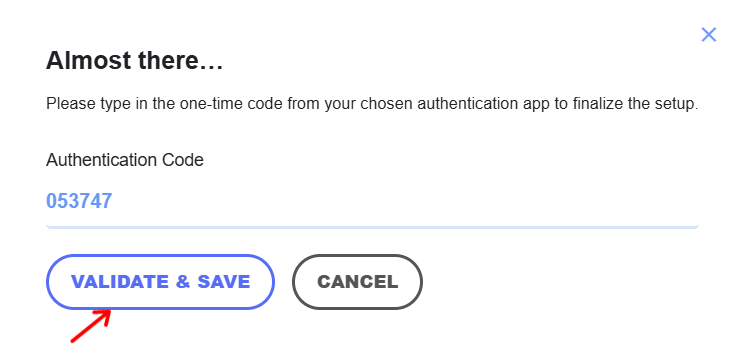
Step 4: Validate the Authentication Code
Next, WP 2FA asks you for the verification of the one-time authentication code. So, you must type the code generated for your site from the app into the ‘Authentication Code’ field. Make sure you do this before the code expires.
Afterward, click the ‘Validate & Save’ button to complete the setup.
Step 5: Generate and Download Backup Codes
Right after that, you’ll find the option to generate backup codes. By using a backup code, you can access your account when you don’t have a phone nearby.
So, press the ‘Generate List of Backup Codes’ button that displays the code list.
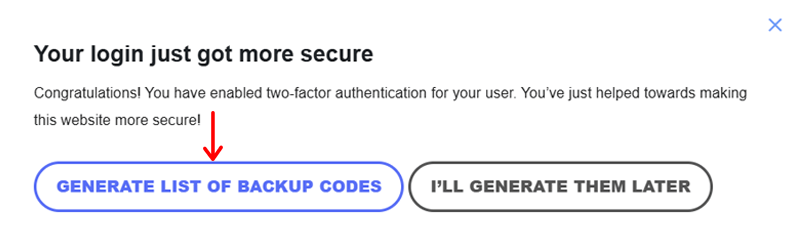
With that, you’ll get several options to download, print, and share the codes. Here, let’s hit the ‘Download’ button to download the file and save it on the computer.

Once the download is complete, click the ‘I’m Ready, Close the Wizard’ button. Ultimately, the overall steps for the configuration end here.

Step 6: Log into Your Site with 2FA
Now, you can try and test logging into your WordPress website with 2FA.
For that, log out of your website and open the login page. There, enter your username and password. Then, click the ‘Log In’ button.
Next, they’ll see the ‘Authentication Code’ field that asks for the code generated by the authenticator app. In some cases, you may be required to enter the backup code.
Then, click the ‘Log In’ button, and now you’re inside your WordPress dashboard.
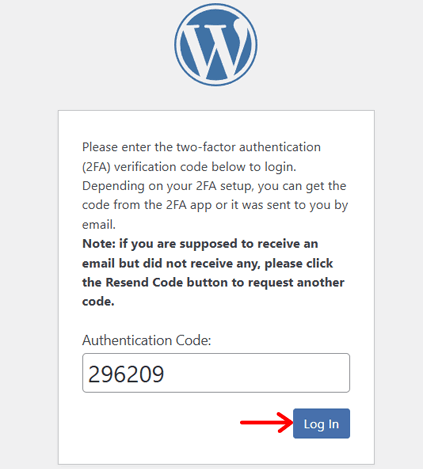
That’s all! Congratulations on enabling 2FA on your WordPress site!
Frequently Asked Questions (FAQs)
Check out answers to some common FAQs here:
1. What are the different methods to add 2FA in WordPress?
The different methods to add 2FA in WordPress include one-time codes from authenticator apps, email, SMS, and hardware keys (like YubiKey).
2. What are the tips for using Two-Factor Authentication effectively?
Tips for using 2FA effectively include utilizing authenticator apps rather than other methods, keeping backup codes securely, applying 2FA for all users, etc.
3. What are the common issues of 2FA and their troubleshooting ways?
The common 2FA issues are authenticator access loss (require backup codes), SMS delay (switch to app), incorrect 2FA codes (time syncing), etc.
4. Is there anything better than Two-Factor Authentication?
2FA is a highly secure mechanism for sites. However, you can use other stronger measures, like MFA (Multi-factor Authentication) or biometric authentication.
5. Which are the strongest forms of Two-Factor Authentication?
Hardware Tokens and authenticator apps are the strongest forms of Two-Factor Authentication. These forms need physical devices and secure apps, respectively.
Conclusion
That’s all we’ve got here!
Hopefully, you now understand how to enable WordPress Two-Factor Authentication. Each of these methods and plugins mentioned is totally free.
So, you can try different options and start using the one you prefer the most.
If you’re stuck at any step, then comment your queries below. We’re happy to help!
Furthermore, check out some additional guides on our blog. This includes eCommerce security, the best anti-spam comment plugins, and the process to remove ‘Not Secure’ from your site.
Finally, follow us on Facebook and X (formerly Twitter) to get post updates.
YOU MIGHT ALSO LIKE...
We've picked you some best articles that you might be looking for. Check them now!